Monday, February 21, 2011

FINISHED SHELVES!

They are finally finished! Well, except for a coat of poly, and another coat of spray paint on the baskets. And maybe a spray coat of poly on the baskets too, because there are already black scuff marks on the shelves from the baskets being taken down and put back up. Right now Mr. B's shelf is too tall for him, but that's okay, I wanted something that would be the right size for a long time. And Miss A's shelf is just barely low enough for her. She can get the basket down by herself, but struggles to put it back up. But who cares? The closet area is much more manageable now. At least it would be if DH would keep his stuff cleaned up. :)Miss A's shelf (obviously)
Mr. B's shelf (again, obviously)

Wednesday, February 9, 2011

Shelves

I know you've all been waiting on pins and needles to see my shelves. If it makes you feel any better I've been waiting too. In fact, I'm still waiting for them to get installed, but until such a time, here's a teaser. I say teaser because some day these bad boys will be installed, the baskets will be completely black (no matter how many times I've spray painted them (okay, only twice, but still) from various angles there is still white showing through), the children's initials will be hung, and jackets, boots, gloves, snowpants, etc. will all be in their proper places. But until such a time, this is the larger of the two shelves, with will become Miss A's (she is older after all, and girls have more accessories than boys, so it only makes sense, right?), which was lying on my living room floor for the picture. But how awesome would shaggy carpet be on a wall? Ummm, yeah, that's what I thought too. I don't even like it on my floor, but considering how expensive carpet is, and that this carpet is only 5 1/2 years old, new carpet will just have to wait, no matter how flat it is.And now, the moment you've all been waiting for.....How I made them!
1. Take measurements of the place where you want to hang them.
2. Go to the store and buy some wood. If you don't have a planar, I would suggest shelling out the extra dough for the nice wood. That's what I did. I bought 2'x8' pine boards, because it's cheaper, and it's easier to make it masquerade as something else (unlike oak). And since you are already at the store, go ahead and pick up some hardware. Hooks to hang things from (like jackets) and also some sort of hardware to hang the shelves on the wall.
2. Bring wood home and start measuring the wood to cut it. The old adage, "measure twice, cut once" really does go a long way and saves you lots of frustration in the long run. Now, if you have a table saw you are in luck, you can cut each board in one cut and not have to worry about flipping the boards over and trying to line up the first cut exactly, perfectly right like I had to do using our chop saw (AKA miter saw). I cut my top and back pieces first, then the sides. My top piece was about 2" longer than the back piece, just for looks.
3. To cut the side pieces I cut a square first (I think the boards are actually 7 1/4", not 8"). Remember, measure twice, cut once. Then after the square was cut I rotated my saw blade so it would cut a 45 degree angle for the diagonal side.
4. Once all the pieces are cut, sand the edges (especially if you used a chop saw like I did). Try as I did to get my cuts to line up, none of them did, so I have some major sanding to do. Not a big deal, because I kind of like the rough look, but I didn't want things looking too rough, if you know what I mean.
5. Wipe off all the sawdust and stain your boards. Remember to stir all the way to the bottom of the can of stain, and follow all label directions. :)
6. If you want them to be a little bit shiny, instead of having a matte finish, do a top coat of polyurethane. This also protects the wood and finish.
7. Put the boards together. I used a nail gun (WAHOO, first time, go me, go me, go me!) to connect the top and back pieces first. Since I wanted the top shelf to be a little wider, I had to attach the boards differently than I originally planned, but that's okay. Then after attaching the top and back to each other, attach the side pieces.
8. Pre-drill holes for the hardware screws, then attach the hardware.
9. Hang up.

All in all, the project wasn't too hard. I still need to do a coat of poly (if I ever get around to it), and of course they shelves still need to get hung, but at least the shelves are assembled, right?

Monday, January 31, 2011

Homemade Bread

I never thought I would be one of those moms that make bread. My mom really didn't bake bread when I was growing up. In fact, I have fond memories of going to the Hostess Bakery Thrift Store with her. However, in my quest to be a little more self-sufficient I went to a class on bread making and found out how easy it is. And for all of you that have a ton of wheat in your food storage and you don't know what to do with it, may I suggest making your own bread? As long as you have a wheat grinder, that is. Without further ado, here is my recipe:

5 1/3 cup flour
1/3 cup wheat gluten (I found mine at a well stocked grocery store)
4 tsp. yeast
2 2/3 cup warm water

1/4 cup oil (vegetable, canola, salad)
1/4 cup honey
2 tsp. salt
4 tsp. dough enhancer (I had to get mine from a natural foods/health food store)
1 1/3 cup flour (more or less as needed, I usually need more though)

Directions:
1. Place 5 1/3 cup flour in mixer with dough hook (see note below about mixers). Add yeast and gluten. Add warm water and mix for one minute, or until everything is mixed. Cover with towel and let sit for 10 minutes.
2. Add oil, honey, and salt. Turn on mixer and add dough enhancer and the remaining flour until dough cleans sides of bowl (it's better to add less flour than too much)
3. Knead bread for 7-10 minutes. Preheat oven to 150 F (mine only goes down to 170, which is fine too).
4. Oil hands (olive oil), divide bread into two equal portions, shape into loaves and add to greased pans (I use Pam, which works wonderfully)
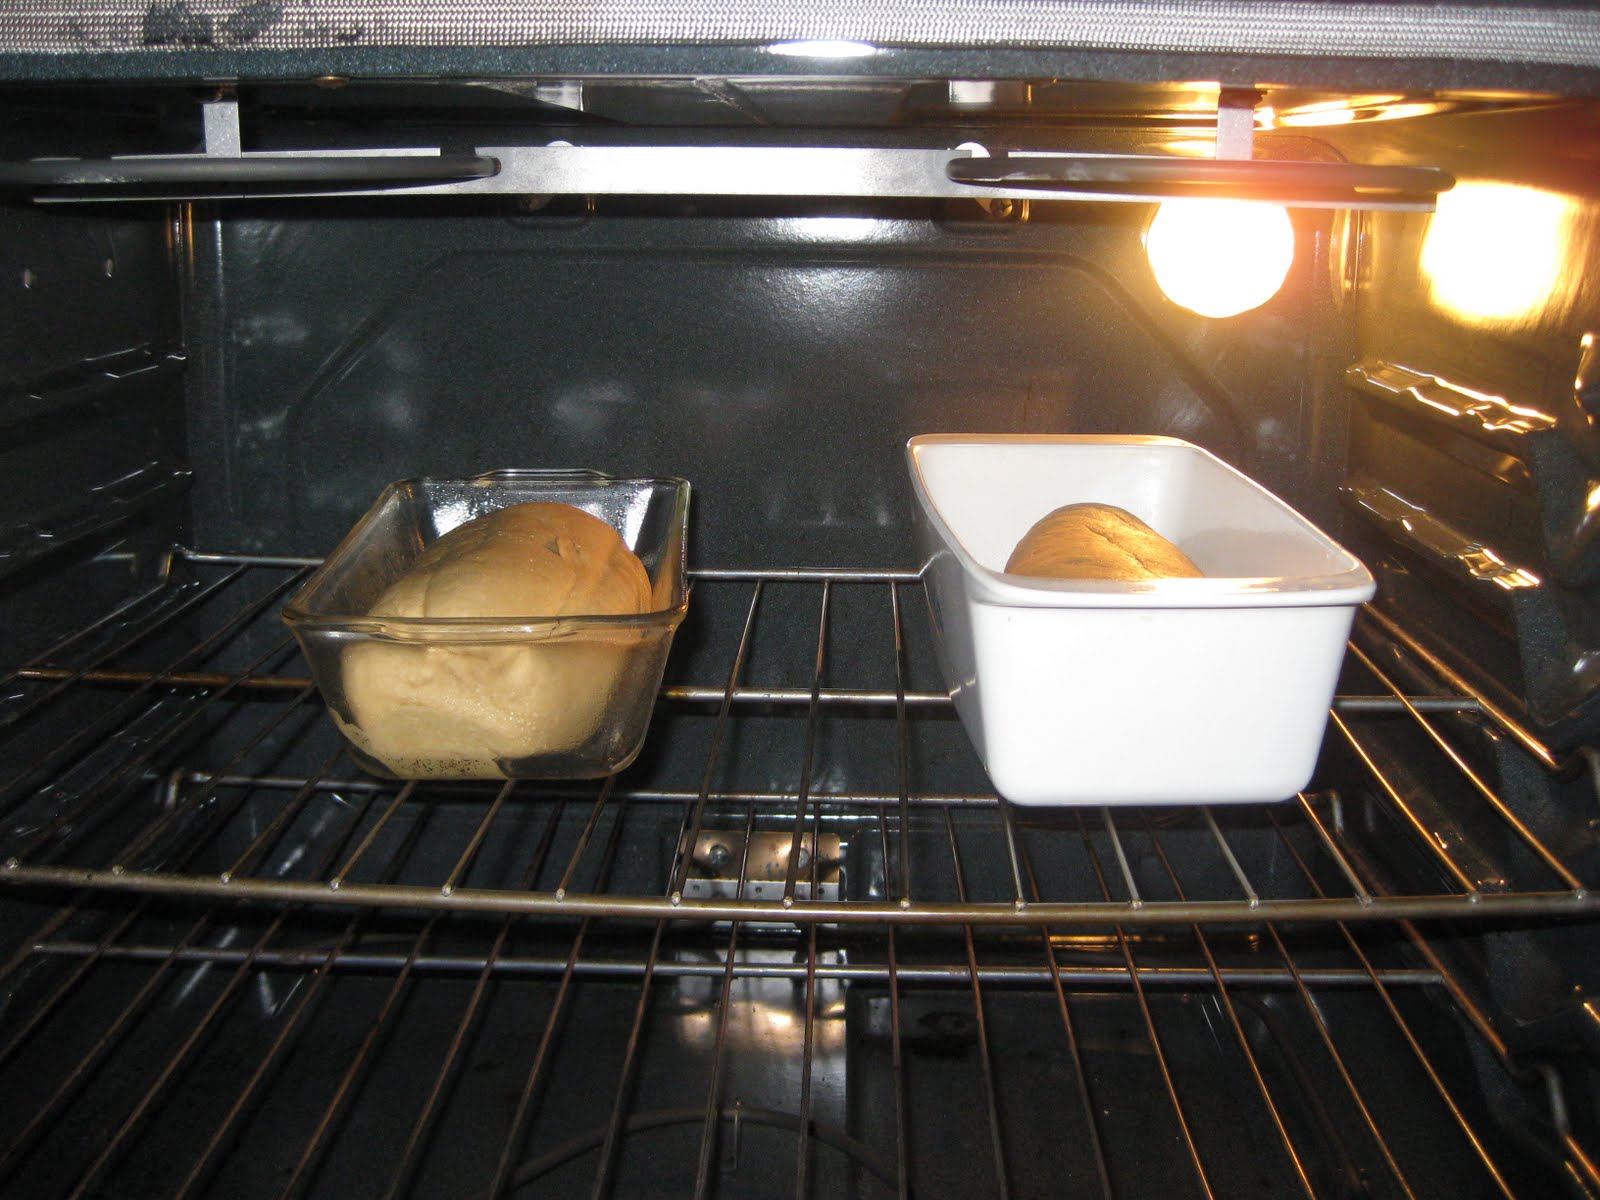
5. Put loaves into the oven, shut the door, turn off the oven, and let rise for 25 minutes.
6. Turn oven on to 350 F (with loaves inside). When up to heat, bake for 25 minutes. If you want, you can put a pan of water on the lower rack of the oven. This helps the bread to not be so crusty.
7. Remove bread from oven and pans and let cool on a rack.
8. Cut and enjoy!

Note on Mixers: If you are using whole wheat you need a serious mixer. I have a KitchenAid professional mixer, and if I let it mix for too long (the dough hook helps knead the bread) the motor gets pretty warm. You cannot make this using a standard mixer. A good Bosch would work too. I don't think the miniature one would work though.

Saturday, January 29, 2011

Project Report

Can I just say that I love that I put my list of projects up here? This way I'm able to self-check and make sure I'm getting things done. And getting things done I have been (too bad my house isn't as clean as it should be, so my budget for next month will be a little tight).

Things I've completed:
Love Blocks
Pink flower hair clips for BIL's wedding
Vinyl Nativity Glass Block
Redecorating for Valentine's Day (this was easy because all I have is two small metallic garlands and two sets of gel window clings (and now the wooden blocks too!)

Things in the works:
The coat hangers/shelves. I've stained all the wood (still need to do a coat of poly on top) and spray painted the baskets ($3 at DI!). Need to get the nail gun back from a friend so the bad boys can be assembled and installed.
Seed packet wall hangings. I figured out where to put them, but I need to take down the other ones, putty, texture, and touch-up the wall, then rearrange them all, since they are all going together. That's why it hasn't gotten done yet. So many steps, and so much laziness. It took long enough just to figure out where to put them. :)

The skirt idea got scratched off the list, since I found a super cute eyelet sundress at DI for $5. It does need a cardigan to go over it, but I'm hoping a few more trips to DI should solve that problem. Can you tell that I love thrifting?

Something I might do soon:
Work on my quilt. It would be nice to have done, but it's such a big project, involving pulling out the sewing machine and making a mess of the living room. Oh how I wish I had a craft room.
Oh, and I might work on painting those wooden fences from the dollar store. They will be super cute hanging on a wall in my living room if Spring ever shows up. Which should be around June here in Idaho.

And, some eye candy:

These blocks are so easy to do! If you have a huge stockpile of scrapbook paper and scrap 2x4s, they are basically free! These papers I actually printed off my computer. I have a former roommate that designs digital scrapbooking materials, and this is from one of her kits, Sweet Love O' Mine. Go here to get it. Go here to visit her blog. Yari is awesome and I love pretty much everything she designs! So, to make these blocks, cut some 2x4s. I don't measure I just cut some bigger, some smaller and really just eyeball it. Then I measure so my papers will be the right length. The papers need to be 3" wide, and whatever length. Mod Podge the background papers to the blocks. If you have a Silhouette or Cricket cutting out letters is easy. I don't, so sometimes I use an alpha set from a digital scrapbooking kit, but this time I made my own using a font from Photoshop, and then using the masking text tool and a few other steps to make the font, including a layer style to get the ridges around the edges. So, after I Mod Podge the background papers I Mod Podge on the letters, then put another coat of Mod Podge over the top. This can all be done in about an hour, if you don't have littles (children) distracting you. Or husbands, or pets, or life, or whatever. I might still add some ribbons or flowers or something, but I still have bathrooms and a kitchen to clean.

My vinyl Nativity. I love how this turned out. I ordered from the site Say it on the Wall and was very pleased with the outcome. Laura has an offer for people who become "affiliates" so I got $5 in free vinyl from her! I did have to pay shipping, but that's okay. And this was a custom design. She had quite a few Nativity designs, but I wasn't completely in love with any of them, so I asked her to tweak the "O Holy Night" one, and she was more than happy to oblige. She was great to work with! And her vinyl was the easiest to work with that I have ever done. I thought the hay in the manger was going to be a pain, but it was EASY! It was actually the bottom corner, under Joseph that almost ripped because I wasn't paying attention. But it didn't. Thanks, Laura!

Saturday, January 22, 2011

Super Easy No-sew Tutu

Another guest post:

A tutu for Miss A. that Mr. B wears about as much as she does.

A Fall Wreath Tutorial Guest Post

I did a guest post on a friend's craft blog (well, I actually did two).

It's a fall wreath I made for under five dollars!

Go here to check out the tutorial:

Two Winter Projects from Last Year

These are two of my recent crafts. I made the wreath this past weekend, out of a store bought wreath, felt, glitter glue, thread, ribbon, and some safety pins (to secure the mittens to the wreath).
And finally, my "Winter" wood blocks. I'm going to outline the letters at some point in time, since they are a little hard to see.

My Newest Blog

I've had this idea floating around in my head for awhile. I see lots of crafty blogs in the blogosphere and some of them are fantastic. I have a digital scrapbooking blog, which has been a fun creative outlet, and I have a private family blog. But I really needed another outlet for my projects. The thing is, I don't think I'm very funny, so I don't know how many readers I will get. My goal is to do at least one post a week (this way I get some projects done, right?) and hopefully be able to help others get their craft (or other hobby) on too.

A little bit about me...

I'm a 5'5" natural brunette with the most beautiful blue eyes (I don't mean to brag, but my daughter gets compliments on her eyes so often, which she gets from me, that I can't help it :)). I like virgin pina colodas and don't like to take walks in the rain. Something about getting soaking wet just doesn't appeal to me. I'm a SAHM of two kids, Miss A who is four, and Mr. B who is two. My DH is an engi-nerd that convinced me that I was madly in love with him, and two months after that we were married.

My loves and hobbies...
My Heavenly Father is my first love and my family is my second love. My hobbies...oh, that's a long list. Since 2007 I've been an Idaho Master Gardener (no, I don't grow potatoes), but this year I'm going to take a break from the MG program. I used to paper scrapbook, but since having children (I don't have any kids, goats aren't allowed in city limits) I've taken a break from that and now enjoy digital scrapbooking. I used to make cards, but again, the children. What I do instead: occasionally sew, pretend to quilt (I've been meaning to make a quilt for my bed for the last year, and even had the whole top put together until I realized the colors were too bright for my bedroom, so I gave it to my mom), buy Christmas decorations for cheap, buy gel window clings, decorate my living room for various holidays, reorganize, make dollar store crafts, and just craft in general.

Projects in the works or planned:
Coat hanger/rack things for the kids
Quilt for my bed
Wooden fence wall hanging things bought at the dollar store and needing to be painted
Quilts for the children
Flower hair clips for BIL's wedding for the nieces
Possible skirt for BIL's wedding for me
Glass block and vinyl nativity set (mostly just need to purchase the vinyl from an online store)
Hang some seed packet things that I bought and framed a long time ago
Redecorate for Valentine's Day

Yeah, so I think that's a lot of projects to keep me busy for awhile. And having them here holds me accountable to you, dear reader, whoever you may be. In the mean time, I'll see if I can find some of my old tutorials to post for your crafty goodness.

Have a fantastic day!